A Paper Series Post
One of the easiest and most inexpensive ways to decorate for the seasons is to use paper products. French Country fall owl prints were created by reimagining paper placemats from their usual purpose. Placemats for the table were transformed into eye-catching gold embellished prints and became the star focal points on fall decorated shelves in a garden shed.
The beautiful owls from the placemats are a new twist on Halloween decorations. Not the usual black crows, but stunning white owls, bring fall and Halloween to mind with a fresh perspective on fall decorating.
By using gold spray paint and a gold paint pen, the already gorgeous owls were kicked up a notch to glamorous elegance. What's more, the makeover was easy, and anyone can create similar stunning prints for your own home.
F r e n c h C o u n t r y
f a l l
O w l s
Where did these unusual paper placemats come from? Hester & Cook sells paper products in a range of beautiful designs. A couple of years ago, I used their owl paper placemats for a White Christmas Peonies | French Table Setting in my breakfast area.
Since the placemats come as sets of 30, there were plenty left over from that Christmas table setting. Their whimsical unique greenery headdresses and neutral colors remind me of fall. Using existing items in new ways is a great way to save money and to use something you already love.
Don't you love that white owl!
Here is how I repurposed paper placemats as Fall / Halloween prints.
M a t e r i a l s
- Owl placemats - Hester & Cook
- Gold Paint Pen - 0.7 mm by Pen-Touch
- Gold Spray Paint - Rust-oleum
- Heavy White Watercolor Paper
- Mat Board for Framing Prints
- Glue - Mod Podge or 3M Spray Adhesive
- Scissors
- Sources for the materials are listed at the end of the post.
Tri-Fold Standing Card
General outline of how to create tri-fold standing card...
- Cut white watercolor paper 1/4" - 1/2" wider than owl paper placemat on all sides
- Paint gold accents on owls
- Glue owl placemat to watercolor paper
- Fold the large board at 2 places to form a zigzag shape
Halloween decor often includes birds, and the owls sparked ideas of using the placemats with elegant gold and white Halloween wood signs. From there, it occurred to me I could add gold accents with a gold paint pen and easily use the placemats as prints to coordinate with the gold and white wood signs.
Heavy White Watercolor Paper
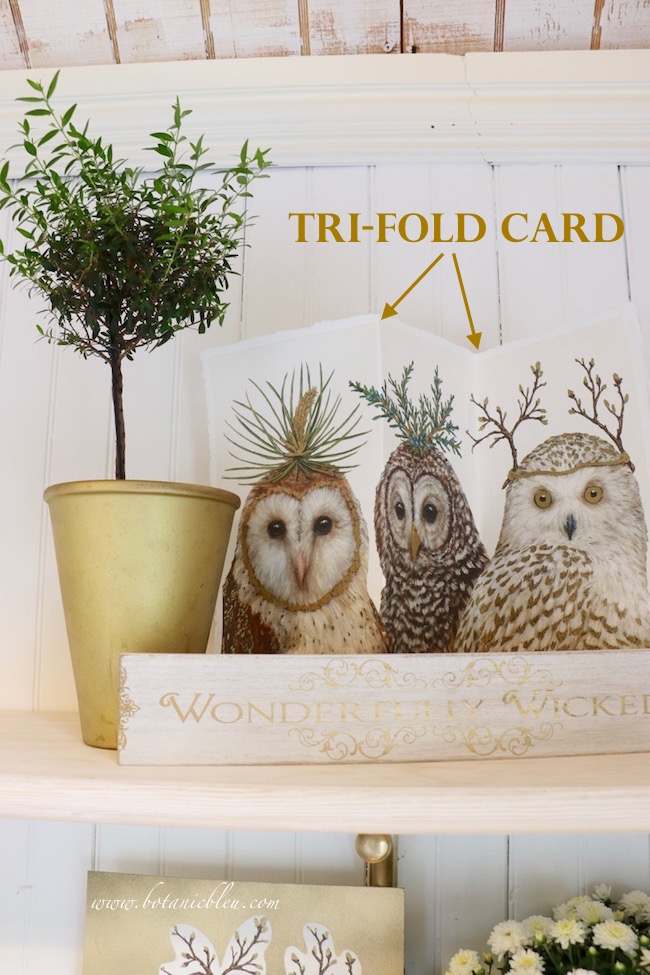
A large tri-fold card was created by gluing an entire owl placemat to heavy white watercolor paper. The placemats are 13" x 20". After adding the gold pen accents (see below) to the flat placemat, glue the entire placemat to the watercolor paper. I used Mod Podge glue, but think the 3M Spray Adhesive probably gives a smoother bond between the placemat and the watercolor paper.
The heavy watercolor paper gives enough stiffness for the tri-fold card to stand. The paper placemats are too thin to stand without a backing. Poster board could also be used as a thick backing for the tri-fold card, but watercolor paper has nicer texture and borders.
Watercolor paper usually has deckle edges that add textural interest to the borders of the paper. In order for the card to stand, use a straight edge, not deckle edge border at the bottom of the card. Allow about ¼" to ½" on all sides of the placemat so the watercolor paper backing is visible.
Fold the watercolor paper backed placemat at two places so the tri-fold card will be a zigzag shape. One fold pointed out; one fold pointed in.
You do not have to have the folds exactly the same distances apart. Let the print design dictate where to fold. These three owls are different sizes so I folded the card at the spot somewhat where one owl ends and another owl begins.
TIP
Watercolor paper comes in large sheets, bigger than the placemat which means the watercolor paper will have to be cut to size. In order to create a ragged edge border similar to the deckle border of the watercolor paper, do the following.
- Mark where you need to cut the watercolor paper with a light pencil mark along the entire border edges.
- Do NOT cut the paper. Instead, fold the watercolor paper along the pencil mark guides. Fold the paper back and forth several times to get a distinctive hard fold.
- Use a small artist paint brush to paint clear water along the folds on both sides several times to saturate the paper's fold. You want water saturated about ¼" wide along the folds. Hold the paper up to the light. If the paper appears translucent wet along the water saturated fold, you have applied enough water. If the fold still has sections that do not appear translucent, apply more water.
- Fold the paper back and forth again along the water-saturated folds.
- Gently tear the paper along the wet folds which gives you an irregular ragged edge instead of a sharp cut edge. After completely tearing the watercolor paper apart, use your fingers to press down the uneven ragged edges. The light pencil marks showing where to fold faded away on my watercolor paper edges.
- Allow the edges to dry completely before gluing the placemat to the watercolor paper. You may need to weight the paper along the edges to prevent the paper from curling.
Individual Owl Prints
General outline of how to create the individual owl prints...
- Spray paint mat boards
- Paint gold accents on owls
- Cut out individual 3 owls
- Glue owls to the gold mat boards
Spray paint mat boards with gold spray paint to mount individual cut-out owls from an owl placemat. Mat boards are sturdy enough to use alone for prints or to use inside a picture frame, but too thick to use for tri-fold cards. The boards cannot be folded.
Several years ago I bought one large mat board around 2 feet by 3 feet, and the craft store cut the large board into smaller mat boards. The boards shown are about 12" tall by about 9" wide.
✯ If you plan to use the mat boards inside purchased picture frames, have the craft store cut your large mat board into standard picture frame sizes. The craft store employee will know the dimensions of standard picture frames.
DIY painted mat boards are an inexpensive way to make a beautiful backing for prints that lean against a wall.
See last fall's Elegant Halloween Black and Gold Mantel where I painted card stock with gold spray paint to back magazine photos.
Gold Accents
Use a gold paint pen to accent the placemat owls. Do this before cutting out the owls or gluing them to the watercolor paper and/or mat board.
From using gold paint pens in past projects, I found I like the 0.7 mm Pen-Touch paint pen best. The color is a nice shiny metallic gold, and the 0.7 mm nib thickness allows precision painting. When thicker gold brush strokes than 0.7 mm are wanted, simply add overlapping strokes until the desired thickness is reached.
Paint the gold accents on all of the owls on the placemat before cutting out the owls for individual prints.
For each of the owls I added gold accents to
- Headdress
- Body Feature
- Feathers
Use the original placemat design to guide where and in what direction to add gold color. The gold should add to the design, not overwhelm the print so the original design is lost.
The most challenging gold accents in the white owl are in the feathers. Match the direction of the pen strokes to the direction of the original feather dark colors. Notice the pen strokes are mostly vertical, not horizontal. Also, the pen stroke directions on the wing are different from the pen stroke directions on the owl body. Just follow the artist's original drawn design so the pen strokes help define the wing versus the body feathers.
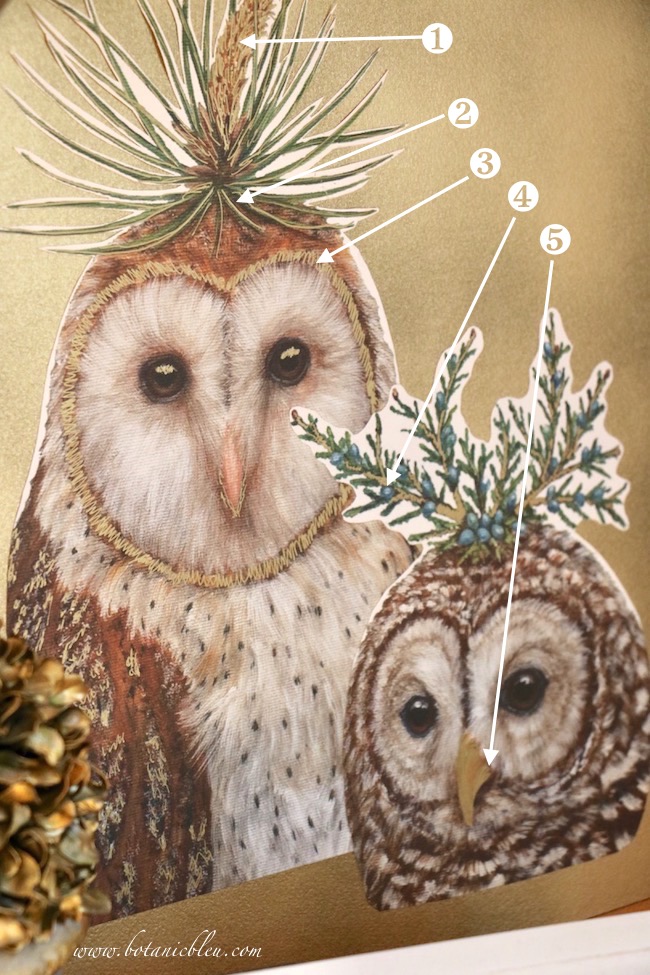
Gold accents on the brown owls...
❶ Headdress
❷ Headdress - each green branch has one narrow gold accent that still allows some of the green visible
❸ Body Feature - Face fringe brushstrokes change direction around the face
❹ Headdress
❺ Body Feature - Beak
Feathers were accented on the large tri-fold card version of all the owls and on the individual large white owl, but not on the individual prints of the brown owls attached to a gold backboard.
After adding gold accents to the owls, use scissors to cut out the individual owls from an owl placemat.
Trim close to the owls' bodies and heads, but cut a large white border around the owls' headpieces which you will trim more closely after the owls have been cut out from the placemat.
Cut curved edges around the two "antler" pieces.
For the small owl, cut around the headdress leaving curved edges.
In the original placemat the body of the small owl above is mostly hidden behind the other two owls, so it is not possible to show the entire owl. Instead, cut off the bottom portion of this owl, and place it to overlap the larger owl.
Use 3M Spray Adhesive to attach the owls to the gold mat boards.
Spray the back of one owl at a time with adhesive, and attach it to a board before applying adhesive to the next owl.
Spray adhesive is unforgiving and once the individual owls touch the mat board, the positions cannot be changed. But, the adhesive creates a smooth tight bond between the board and paper prints, much nicer than Mod Podge.
Begin attaching an owl along the bottom edge, and slowly smoothing the owl down using your fingers to press the owl down onto the board so there are no air pockets or wrinkles.
Place the large tri-fold print somewhat in the center of the top shelf.
Balance the arrangement by placing one individual print to the left of center on the bottom shelf, and by placing the other print to the right of center on the countertop.
~~~~❦~~~~
The placemat owl prints are an unusual twist to Halloween on the Fall French Country gold and white shelves in the garden shed, but also would be beautiful on a mantel, as a table centerpiece, or on a buffet.
Now you have seen the details, keep your eyes open for your own personal twist to seasonal arrangements by using paper photos in a slightly different way than expected. You can easily create inexpensive decor with a little spray paint and some glue.
Add a little magic to your Fall decor.
s o u r c e s
Winter Owl Placemats - Hester & Cook, online
Gold Paint Pen - Pen-touch at Hobby Lobby
Gold Metallic Spray Paint - Rust-oleum at Home Depot
Watercolor Paper - Michaels
Mat Board - Michaels
Mod Podge - Michaels
3M Spray Adhesive Super 77 - Home Depot
There are several 3M Spray Adhesive versions; 77 is the version for paper products. Michaels offers a repositionable 3M spray adhesive, but shopper reviews say the repositionable spray is not as good as version 77.


